A custom fry cup is a simple-looking object with a surprising number of decisions baked into it. Order without settling them and you get a proof that misses the mark, a cup that darkens with grease before the customer finishes eating, or a minimum you didn’t expect. This walkthrough runs the specification in the order a converter actually needs it, so the quote comes back clean and the first proof is close to final. Work through the five steps below before you request pricing.
Step one: fix the shape and the capacity
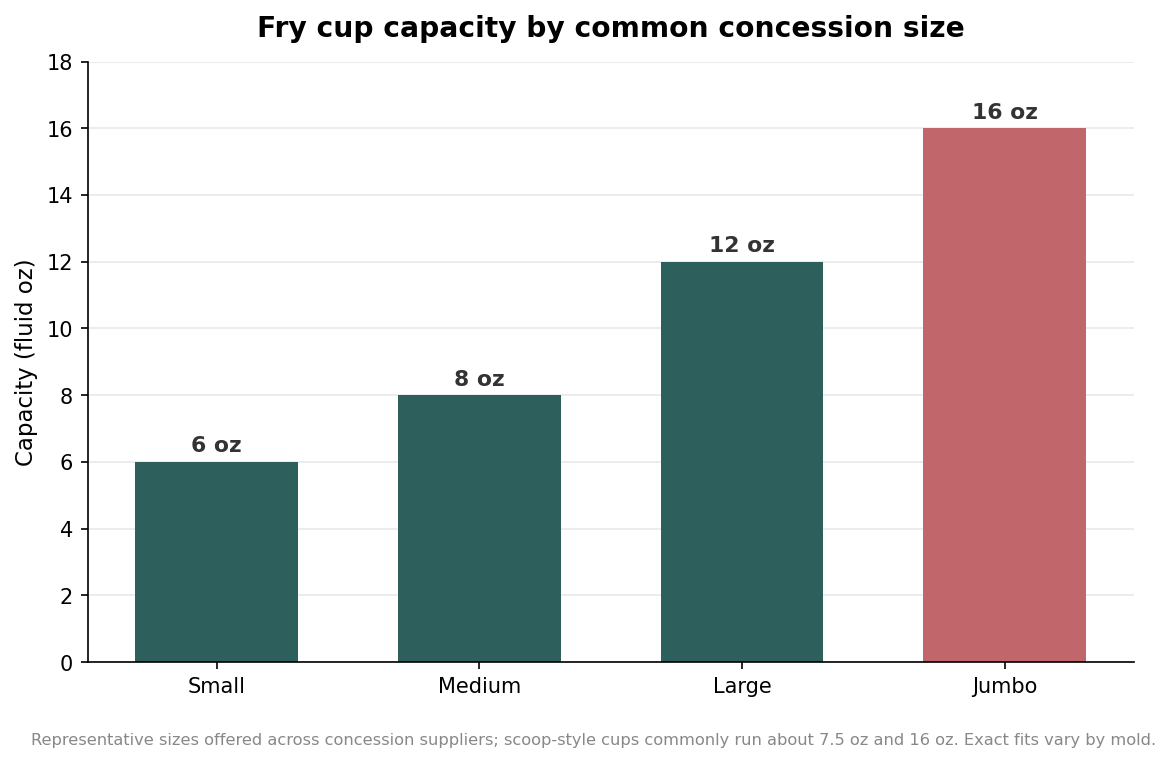
Decide the container style first, because it changes everything downstream. An open fry cup is the tapered, wide-mouth cup most people picture; a scoop cup has a lower front wall so the fries fan toward the customer, which suits grab-and-go and speeds loading at a busy window; a fry boat or tray is the open-top option for combo baskets. Once the style is set, pin the capacity in fluid ounces rather than in vague small/medium/large language. Concession fry cups cluster around 6, 8, 12, and 16 ounces, and scoop-style cups commonly run about 7.5 and 16 ounces. Match the ounce size to the portion you actually serve, not to the label on the menu — a “large” means nothing to a printer, but 12 ounces is unambiguous. If you serve a combo, size the cup to the portion after the fries settle, not to a heaping first pour, so the lid of the tray or the bag still closes cleanly.
Step two: choose the board weight and the grease barrier
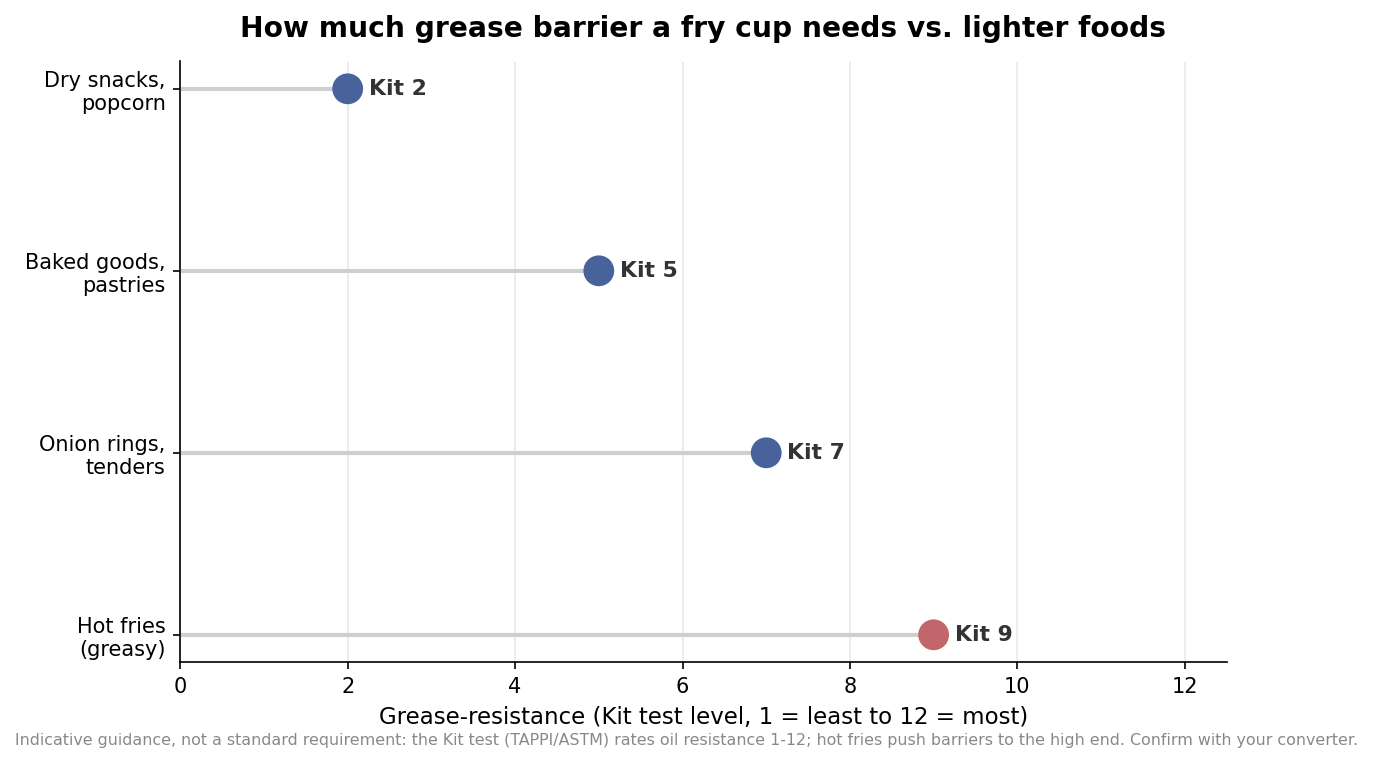
Two separate properties are hiding in the word “paper” here: how stiff the cup is, and how well it resists oil. Stiffness comes from the cupstock weight, usually quoted in grams per square meter; single-wall fry cups typically sit around 250 to 300 gsm, heavy enough to hold shape under hot fries without feeling like a shirt box. Grease resistance is a different measurement entirely. The industry uses the Kit test, a standardized oil-resistance scale that runs from 1 (least resistant) to 12 (most). Dry snacks are happy at the low end; hot, salted, oily fries push toward the high end, and a barrier that is too light will let grease wick through and stain the print within minutes.
How you get that barrier matters more than it used to. Traditional cups relied on a thin poly (PE) coating, and some still use it; compostable programs favor PLA or water-based dispersion coatings. The important change is regulatory: PFAS — the “forever chemicals” once used as cheap grease repellents — are now banned in food packaging in a growing list of states, so a compliant fry cup uses a PFAS-free barrier by default. Ask your converter to confirm both the Kit level and PFAS-free status in writing.
Step three: pick the print method and lock the colors
The right press depends almost entirely on your quantity. Flexographic printing is the workhorse for large runs; the plates cost money to make, so the economics only work once you are ordering in the many thousands. Offset (litho) printing delivers the sharpest, most photographic results and suits mid-volume premium work. Digital printing skips plates entirely, which makes it the sensible choice for short runs in the hundreds, for test batches, and for variable designs like a series of flavor or event variants. Specify your brand colors as Pantone (PMS) references rather than trusting “make it match” — and remember that all inks must be food-safe and applied to the outside of the cup, never the food-contact surface.
Step four: build the artwork on the converter’s dieline
A fry cup is printed flat as a fan-shaped blank and then formed, so you cannot design it as a plain rectangle. Ask for the exact dieline (the flat wrap template) for your chosen size and build the art inside it. Keep critical elements — logo, price, key text — inside the safe zone and away from the top and bottom rims, which curl during forming. Extend background colors past the trim as bleed so no white slivers appear at the edges, and account for the seam or overlap where the blank joins, since a logo placed across that seam will look broken on the finished cup. Supply artwork as vector files with fonts outlined and images at high resolution. Getting the file right on the dieline is the single biggest thing that separates a one-round proof from three rounds of revisions.
Step five: confirm minimums, proofs, and lead time
The last step is logistics, and the numbers here are indicative rather than fixed. Fully custom printed cups usually carry higher minimums than stock cups because a run has to justify plate or setup costs, though digital short runs have lowered that floor considerably. Always request a physical or digital proof and, for a first order, a press proof if the budget allows — screen color and printed color on coated board are not the same thing. Plan the calendar generously: custom printed cupstock commonly takes in the range of two to six weeks depending on volume, print method, and whether new tooling is involved, with digital runs at the faster end. Build in that lead time before a festival, a product launch, or a seasonal menu, and order a modest buffer over your forecast so a strong weekend doesn’t leave you serving fries in plain stock cups. It is also worth asking whether the converter keeps your dieline and plates on file, because a documented repeat order ships far faster and cheaper than starting the setup from scratch every season.
Leave a Reply